Crimson Desert: Toward the Nest — how to activate the skybridge
Here’s how to activate the skybridge in Crimson Desert
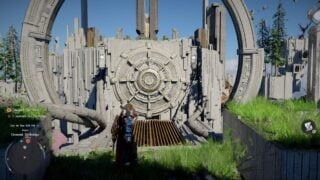
Your pursuit of the Crowcaller takes you back into the abyss in the sky, where more ancient machines await your steady hand. When you first arrive in the Crescent Skybridge, make sure you activate the fast travel point on the floor in case you fall off.
The first thing you need to do is climb. Your goal here is to reach the upper platform directly across from the laser-firing orb where you arrive.
There are plenty of ways to make the climb. You can walk along the crescent edge to the right and climb up the structure there. You can climb onto the rotating rings and let them carry you up before gliding off. You can use consecutive jumping Force Palms to get height and glide into position.
Once you’re up, head to the unpowered gear in the east. From here, you can see three power cables, two on the left and one on the right, leading to the gear. If you hold up your lantern and check the cables, you can see there’s no power coursing through them.
You need to follow each cable back from the gear and figure out how to get power running back through it. Let’s start with the cable on its own to the right.
Follow it along the crescent walkway, and you’ll see the cable is split, and you can repair the split by interacting with the connecting pipe.

Unfortunately, the cable still isn’t powered so you need to carry on following it back to diagnose the issue — be careful of the deadly blue flowers as you follow it along the walkway. When you reach the end, it goes into the ground near a square machine. Across the way, there’s a laser orb. You need to glide across.

From behind the sphere, use Axiom Force to grab the center of the ball. This gives you control, allowing you to use the D-pad to align the laser with the gem across the way. That’s one cable sorted.

Head back to the gear and follow the cable leading up on the other side. Once again, you need to glide over to the sphere across the way and line the laser up with the gem.

Now head back and follow the cable leading down on the lower walkway. As with the first cable, this one is suffering a break that you can fix at the connecting pipe.
This will power up the gear, which you need to fully activate by climbing onto its center and hitting it with a Force Palm. Climb up past the gear, and you’ll get an abyss artifact.

Head through the triangle forcefield on the right and a switch will pop out of the ground. Grab it with Axiom Force and use the D-pad to find the sweet spot, which will spawn a way forward for you. Climb across the platforms and open your cape above the wind generators to make your way to the final battleground with the Crowcaller.
Crowcaller Tips

Here are some tips that will help you take the Crowcaller, a three-phase boss fight, down:
- Make sure you bring plenty of food in with you — actual cooked meals, not individual ingredients. It’s a good idea to get into the habit of visiting the grocer and butcher every chance you get so you can cook some meals. Inns also sell meals ready to go.
- Crowcaller hates being tripped. A roll dodge followed by an unarmed melee attack (Y/Triangle) performs a leg sweep. This consistently trips Crowcaller and allows you to get a ground stab in.
- Make use of animation cancels by throwing in plenty of stabs (R1 and Y/Triangle) at the end of a combo. This causes bleed and does damage over time. Another good ability to throw into combos is holding Y/Triangle to flow straight into a pump kick.
- Make use of Abyss Cores. You likely have a bunch by now and you can slot them into your weapons and armour for significant buffs at the witch in the Witchwoods. Some even grant abilities that augment your current moves. The Queen Spider’s venom stab is particularly juicy. You can take cores off your weapon and replace them with all killer, no filler.
- Whenever he crosses his swords and glows blue, he’s about to take to the skies and dive down on you. You can’t hurt him in this state so focus on moving out of the way.
- Make use of counters — perfectly timed blocks — to create openings.