Crimson Desert Sanctum Guide — cleanse all sanctums in Witch of Wisdom
Here’s how to cleanse all sanctums in Witch of Wisdom in Crimson Desert
After you’ve met the witch of the Witchwoods and acquired the ability to slot abyssal gears, you also gain the ability to cleanse Sanctums. There are five spread through Hernand and this guide will walk you through each puzzle related to them.
Each time you power one up, Elowen the witch will visit you and talk about the place’s history. You’ll also be granted access to powerful kuku weapon blueprints and more.
Sanctum of Penitence

Deal with the Antumbra worshippers around the ruins and you’ll be free to complete the puzzle. I recommend using the sword (or at least its ability) you get from Crowcaller, since that has projectiles that home in on flying enemies.
The central structure has four pillars around it but one is missing the cube on top. Head up the stairs and deeper into the main ruin and you’ll see the missing part appear on your minimap. Climb up to the top of the ruin and you’ll see it embedded in a pile of rubble in a broken room on the south side. You have to give it a good tug with Axiom Force to unstick it.
Drag it back over to the broken pillar and leave it floating in place. Climb on top and perform a jumping Force Palm to secure it.
Sanctum of Temperance — cleanse the sanctum

Clear out the religious zealots around the ruin and you’ll be free to explore the place and power it back up.
If you look at the minimap you’ll see a central kettle type structure and four stone pillars. One of these pillars is missing its top half, which you can also see on the minimap in southwest side of the area.

It’s trapped inside the broken tower with vines covering the entrance. If you have the means, you can use fire to burn the vines away. Otherwise, you can walk straight through the vines and tank some damage. Find the pillar piece on the floor and grab it with Axiom Force before pulling it into your kuku pot.

Head back to the four small pillars and pull the pillar piece, called a Fusion Reactor Core: III-3, out of the pot before using Axiom Force to slot it back into the broken pillar. Once it’s in place, climb on top and use a jumping Force Palm to knock it in.

On the minimap, you’ll see a square icon on the north side of the ruin. There’s a hole in the ground and some unstable ground you can stand on and cause it to fall away. You’ll find the part you need down here.
Take the cube back to the main structure and slot it into the empty square shaped hole on its east side. Force Palm it into place and the machine will fire up.
Sanctum of Benediction

As with the other two, start by killing all the bible bashers and then check out the central structure and the pillars. This time, one’s missing a sphere topper.
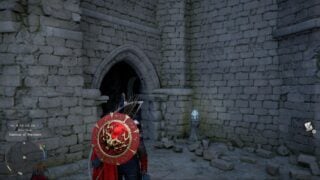
Head down the stairs leading south right next to the pillars, and enter the room on the right at the bottom. You’ll find a cube here that you need to bring back and smack into the square hole at the base of the main structure, like before.

Now head around to the south side of the large tower opposite the main puzzle structure and light the lantern there. This opens a door leading to the missing sphere, which you need to take back and hover it in place over the broken pillar. Now climb above it and jumping Force Palm to knock it into place.
Sanctum of Absolution
This one’s a little tougher because you’ll have to fight a boss, Antumbra’s Sword.
Antumbra’s Sword

Make sure you bring plenty of food for healing, and don’t even attempt this until you’re sufficiently levelled up in health and stamina. It’s helpful if you’ve got a few nasty abilities on your sword, too.
Try not to get greedy in this boss fight — it’s a war of attrition. Make the most of your stab move so you can cause passive bleed damage. When he powers up, focus on getting away because his duplicate ground pound can kill you in one shot. Wait for each of his attack chains to end and hit him with a strong swing followed by a stab twice, and take advantage of perfect blocks and dodges (the latter unlocked in the lower left skill tree).
Because of how chaotic the game is, it’s easy to accidentally neglect stamina management, but that’s a fatal mistake. Make sure to keep on top of it.
If you catch him on the edge of the arena, you can occasionally stunlock him without him replying. Also, never trade blows with him — always wait to attack at the end of his combos.
When you eventually stagger him, take full advantage of the window and go absolutely ham.
When you’re done, have a lie down and make yourself a cuppa.
Now you can complete the puzzle.
The bits you need are indoors near the main structure, just south of where you fought that boss. Drop down into the room below at the end of the corridor and you’ll get the broken pillar piece. Pop it into position and jumping Force Palm it into place, just like the others.

For the power cube, climb through the hole in the ceiling and back up to the corridor just after the boss. There you’ll find a pile of clay pots. Smash the pots and you’ll reveal the cube hidden behind them. Take it to the machine and slam it into the recess to cleanse the Sanctum of Absolution.
Once you’ve done all four sanctums, head back to the Witchwoods to speak with Elowen. She’ll tell you about a reward waiting for you in Labyrinth Grove, but it’s only available once you’ve met all witches.